I love stuff like this. Even more, I love that for under a few thousand dollars, anyone can take video that shows the curvature of the earth.
[via Autoblog]
I love stuff like this. Even more, I love that for under a few thousand dollars, anyone can take video that shows the curvature of the earth.
[via Autoblog]
Based on what you usually see on this site, you might think came out of nowhere, but it took many hours to figure this out, and there is precious little information on the net with actual answers.
Canon’s current consumer and prosumer camcorders (HF M40, HF M41, HF M400, HF S30, HF G10, XA10, and others) encode in AVCHD, and have the ability to record in 30p. However, in the Canon specs, this is described as “30p progressive (records at 60i)”.
The common first-100-google-hits about this suggest doing one of two things:
1. Edit in a 60i (29.97i) interlaced timeline.
2. De-interlace the footage, and edit in a 29.97p timeline.
There are problems with both of these.
It’s not obvious, but it seems that the “PF30” footage (as the Canon cameras call it in their configurations) is recorded as “Progressive Segmented Frame“. In layman’s terms (and believe me, I’m a layman when it comes to this), this means an entire frame is captured in the camera, and then it’s recorded into two separate fields in the 60i recording. The two fields, together, make up the frame.
Sounds a lot like interlaced footage, right? No. With true interlaced footage, half of the frame lines are recorded in each field…but each field is 1/60 second apart. So there are no two fields which, when combined, will yield a complete frame at a single point in time.
So this demonstrates the problem with both #1 and #2 above. If you edit in an interlaced timeline, you’re using footage that isn’t really interlaced. And if you de-interlace it, you’re close but you may not end up with what the camera recorded…and, it’s an unnecessary step, since the footage isn’t interlaced.
Ideally, the editor would detect this PF30 footage, and import it as 30p. However, most editors today do not. Here’s an article about this, re the Canon XA10. In Final Cut Pro X, importing this footage just using Import From Camera will show it as 29.97i.
So what to do? I’ve found two ways to get this footage interpreted correctly as 30p by Final Cut Pro X:
1. Use ClipWrap, a third-party tool (see article). Or…
2. Simply import into FCPX twice; do something like the following:
When you import the second time, the files are just copied over – you can compare the timestamps if you want – so you’re not losing any quality. And after you do this, you’ll see the footage after the second import is shown as 29.97p…and will not need to render if dropped into a 29.97p timeline. Whew!
When I was trying to find the difference between the first and second import, I noticed the second had the Field Dominance Override set to “Progressive”. Aha, I thought…one could simply change this setting on the original first-import footage, and it will be interpreted as 29.97p. And at first glance, it appears to work. However, if you take this footage and put it in a 29.97p timeline, it will have to render, and this should be unnecessary. Just using a second import step eliminates this problem.
So anyway, hopefully this will save someone else a few hours of research!
Well, ok, maybe another day out of the office. :-)
The technical details…onboard footage was filmed in Bear Creek Canyon, just outside of Morrison, CO. It was shot with a GoPro HD; mounted via suction cup to the tank and to the side of the fairing. Other footage is from a Canon HF M40. The bike is my much-loved 2010 ZX-6R, which was badly in need of a bath!
I was editing a video yesterday using Final Cut Express 4, and wanted to create a version that would play on the iPhone. The timeline I was using was 1080i60, and the aspect ratio was 16:9.
First I tried File / Export / Using QuickTime Conversion, and selected “iPhone” as the format:

This created a video that would indeed sync through iTunes to my iPhone, and play successfully, but it messed up the aspect ratio – it exports a video that’s 480×320, which is a 4:3 ratio, so everything in my video was tall and skinny. Pretty useless.
Then I tried File / Export / Using QuickTime Conversion, selected “QuickTime Movie” as the format, and set the compression type to H.264. Dial the bit rate down to say 900 kbps, set the audio to AAC 128kbps, and export. But – no matter what I did (and I tried just about every combination of settings I could think of), this video would not sync to the iPhone through iTunes – it had to go through a conversion (in iTunes, Convert Selection for iPhone/iPod) first. Definitely not what I wanted.
Then finally, I tried File / Export / Using QuickTime Conversion, and selected “MPEG-4” as the format:
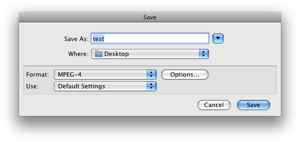
Click “Options”, then make the following settings:
File format: MP4
Video format: H.264
Bit rate: 900 kbps
Image size: Custom (set resolution you want here, e.g. 480×270)
Frame rate: current
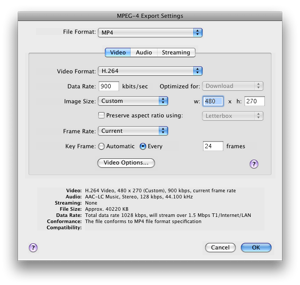
But then, here’s the key to making the whole thing work, which unfortunately took a while to figure out. Click “Video Options”, and set the profile to “Baseline”:
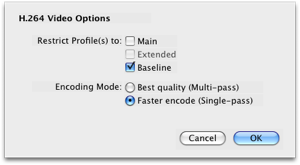
Finally, set the audio to AAC-LC, and you should be good to go.
Hope this is helpful for someone…but at very least, the next time I need to do this, I will have it written down. :-)