Category Archives: development

Pythonista scripts for EC2

My last post discussed doing web development with an iPad Pro and a VPS, and included Pythonista scripts for automating the creation/deletion of nodes on Linode. Today, I’ll show different versions of these scripts that can be used for starting and stopping EC2 instances.

The scripts assume you have an EBS-backed EC2 instance, which we will start and stop. Unlike Linode and others, EC2 instances of this type do not incur charges when stopped (other than storage), so our scripts will simply start and stop the instance you’ve already created.

To get started, first install boto, a Python library for accessing AWS. The easiest way I’ve found to install it is to run this script, which will install boto in Pythonista, in a folder called boto-module.

Then, in a different folder, save the ec2_start.py script:

Modify it to add EC2 instance ID you want it to start, and the AWS access key you want to use. You’ll be prompted on the first run to enter your secret key, which will be stored in the keychain.

The script will start the instance, and then poll every couple of seconds waiting for the public IP address to be available, which will be copied to the clipboard.

If you want to open another app when the script is completed, pass a URL as a parameter to the script such as workflow://, and that URL will be opened when the script completes. See the prior post for an example of how to do this with the Workflow app.

To stop the instance, use ec2_stop.py:

That’s it – pretty simple, and super convenient for starting and stopping EBS-backed EC2 instances from iOS!

Web development with iPad Pro

As I mentioned last week, I’ve recently been doing a bunch of development and other work with the iPad Pro. This has generally been going very well – the only thing I have to go back to my Mac for, at the moment, is QuickBooks. (And yes, I know there is an online version of QuickBooks – however, there is one thing in it that didn’t work well for me last time I tried it, so for now I’m still using the desktop version.)

Part of what I do on a day-to-day basis is web development, using Ruby and Rails. To do this on the Mac I use Sublime Text, and a couple of terminal windows to accomplish what I need. If we break this down a bit, this is what’s needed for development:

  1. An editor for editing source files
  2. A terminal window of some sort for running specs, deploying code, etc
  3. A browser for testing changes

There isn’t any requirement that that editor needs to be editing files on your local machine, nor that the terminal window needs to be a session on the local machine, nor that the browser needs to point to the local machine. Which forms the basis for a reasonable iPad-based workflow for development.

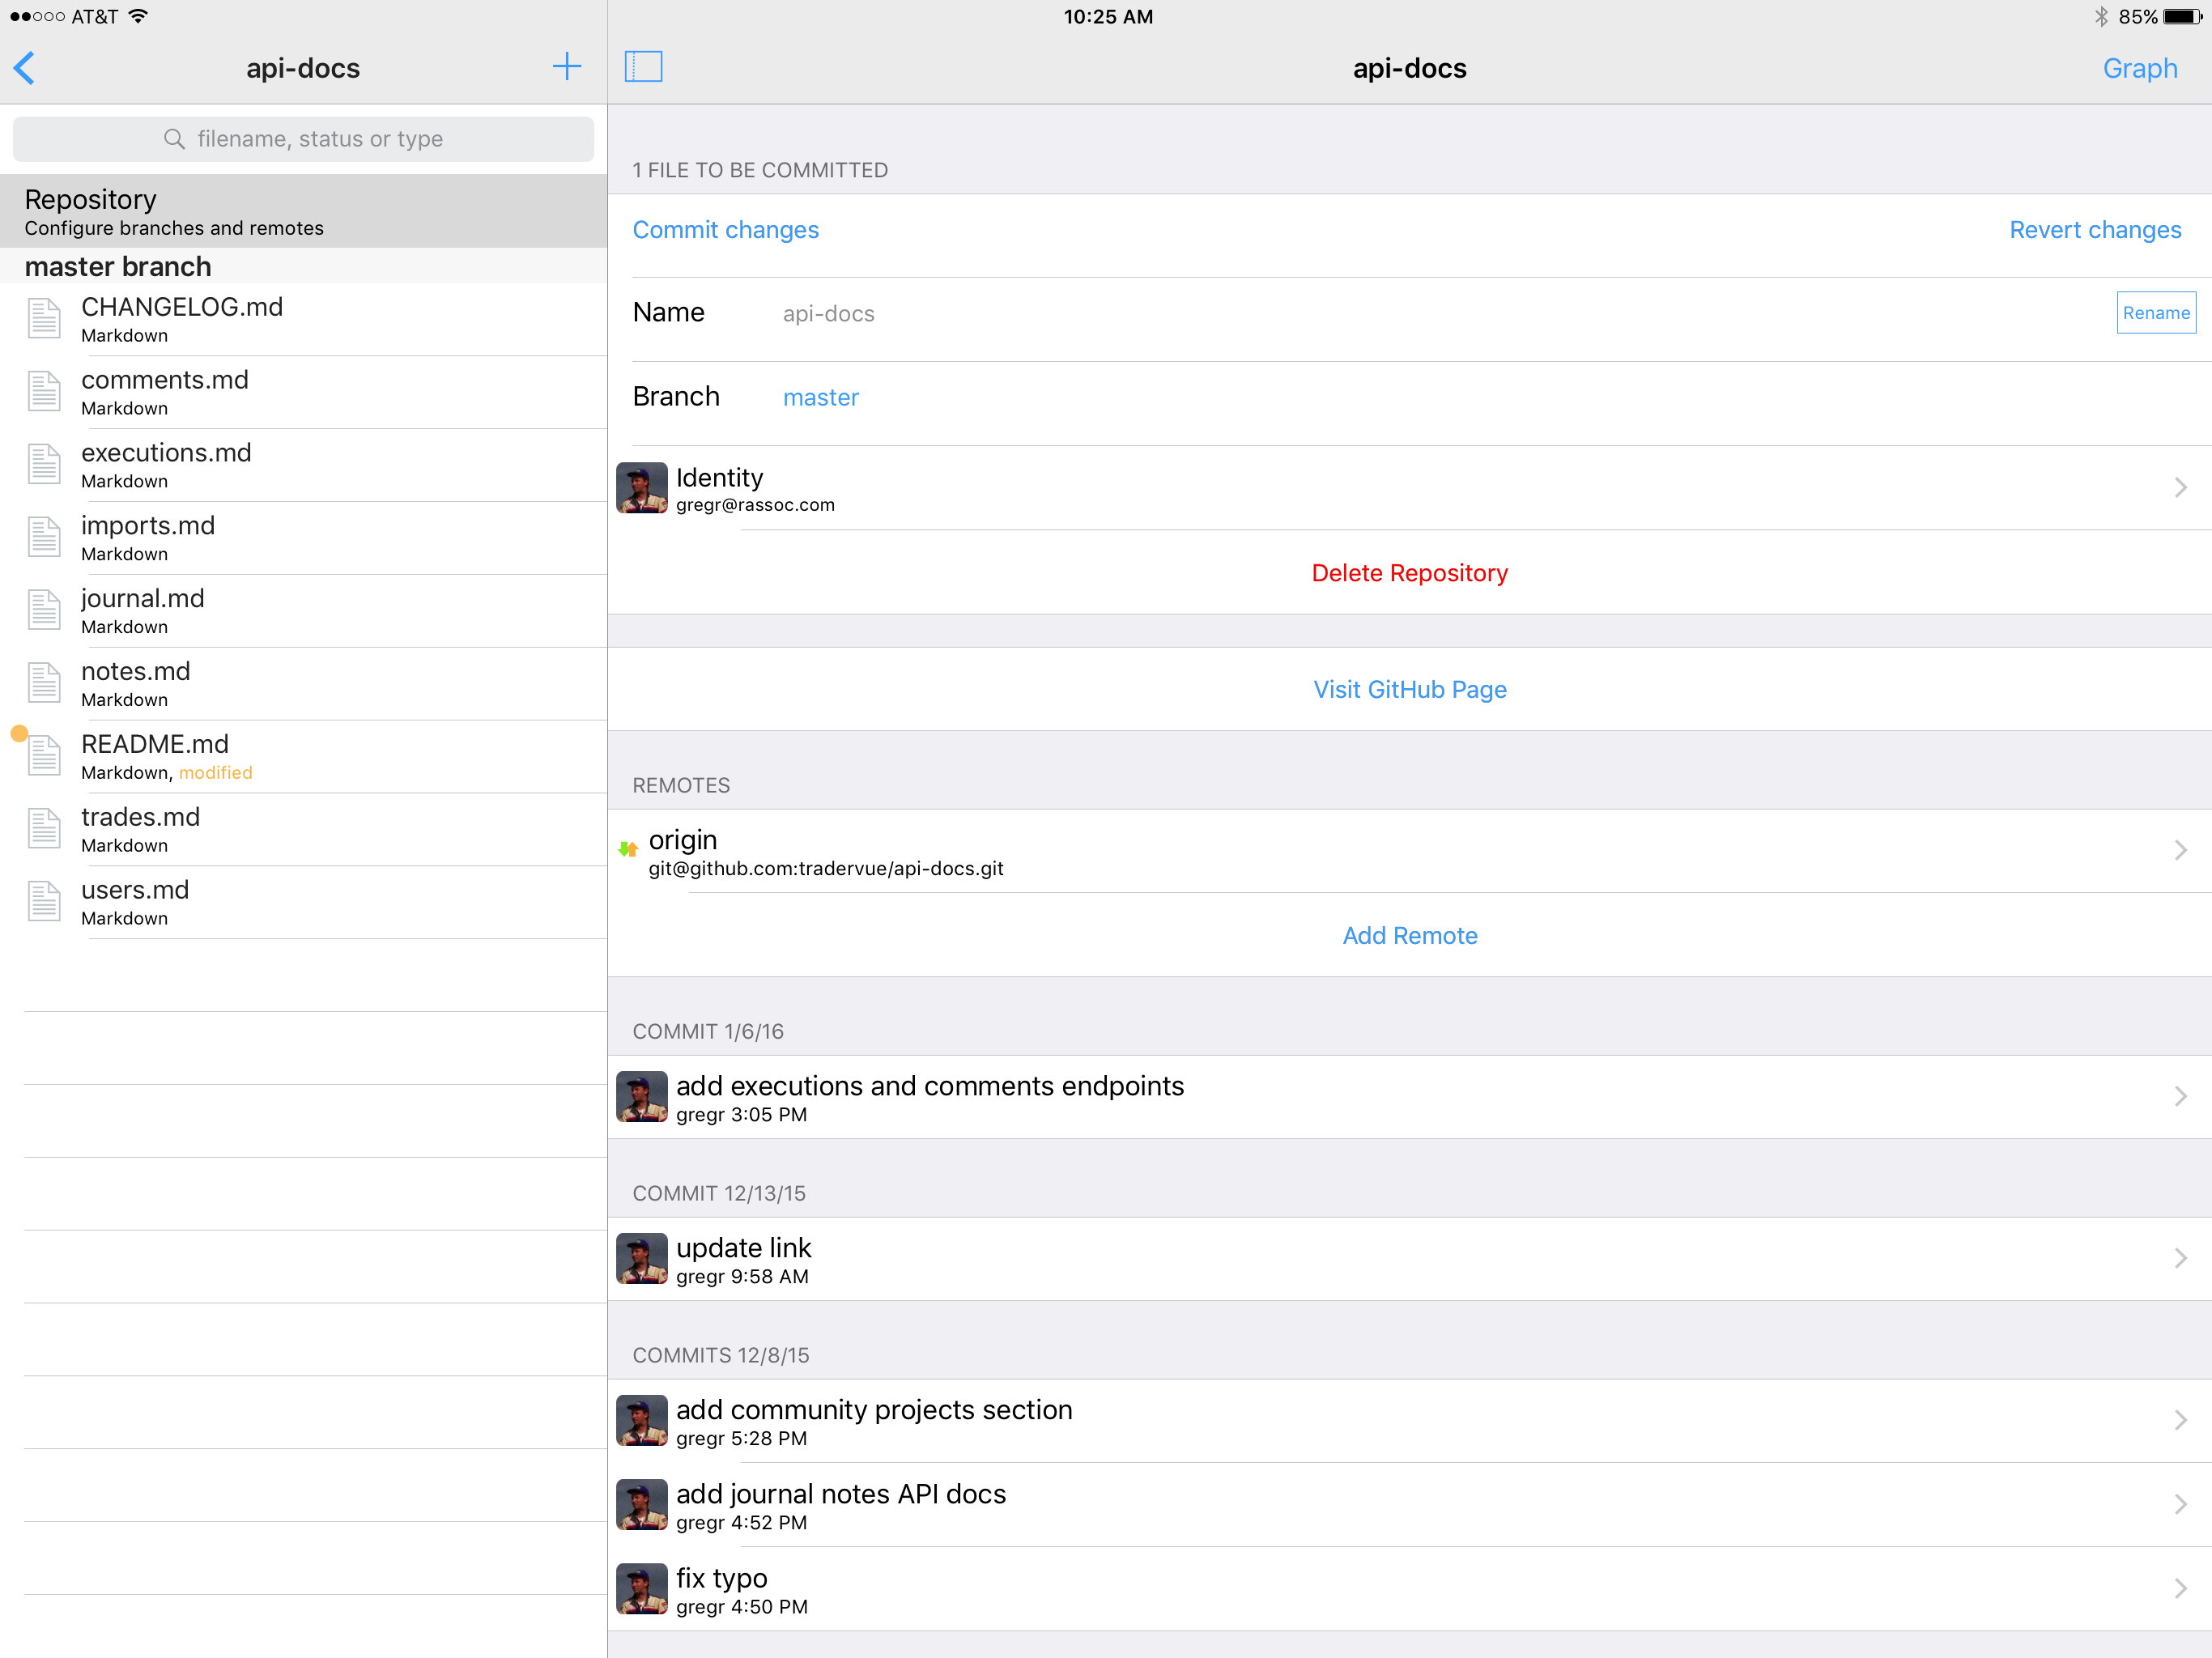
I’ve been doing this using a combination of a development VPS running Linux, and a few tools on the iPad Pro. The main tool I’ve been using is Coda, which combines an editor, SSH client, and FTP client together in one app. In my experience, Coda is sometimes a bit buggy (random crashes, sometimes freezes for a few seconds at a time, sometimes line numbers go haywire), but for the most part it’s quite polished, and definitely worth using.

And Coda has one feature that really ties everything together – it can edit remote files (on my development VPS) directly, without having to explicitly transfer them. Don’t worry – I’m not editing live files on a production server; rather, I’m editing files live on a development VPS, and connecting to that dev machine using Coda.

When I want to make some changes to the site, I simply:

  1. Start up a new VPS from an image I’ve created
  2. Connect to that image from Coda
  3. Make code changes with the Coda editor
  4. Test changes with a browser pointing to the VPS
  5. Run specs, commit changes, etc. using Coda’s SSH client

All in all, this works just as well as making code changes from the desktop – the only real difference is using the Coda editor rather than Sublime Text.

Optimizing the VPS workflow for Linode

I could just create the development VPS and leave it running all the time, waiting for me to connect and use it. However, it’s almost as easy to start and stop the VPS as necessary, and we’ll save a few bucks doing it this way. Plus we can have some more fun, with Pythonista, which was recently updated for the iPad Pro!

The steps and scripts below are for Linode (shameless referral link), but you can do this anywhere you like. Here are similar scripts for AWS/EC2. But for Linode, this is what we need to do:

  1. Create a development server VPS. Install whatever software you need (e.g. Ruby, etc.), clone your source code into a folder, and basically get everything up and running.
  2. Create a saved image of that VPS, using the Linode Manager tools.
  3. Assuming you have the image saved, you can now delete the original VPS.

You now have a saved image, that you can create a new VPS from any time you like. But that will be a lot of tapping around on the Linode Manager to do so…so instead, we can use a script (which uses the Linode API) to automate this, and run this script in Pythonista.

It turns out this script has to do quite a few things; creating a new node from an image in the Linode Manager hides some of these steps from you (like setting up a configuration profile), but we must do them all manually when using the API.

To get set up, first copy the api.py file from the linode-python GitHub repository to Pythonista. You can copy down the entire repo if you want, but the api.py is the part we need. Then, you can use this script in Pythonista to create a new node:

This script assumes it’s in the same directory as api.py, and further assumes the following:

  1. You have an manually-created image saved, and that image is called “dev image”
  2. You want the new node to be called “dev01”, and be saved in a group called “Dev”
  3. You want your new node to be in the Dallas data center, and you want it to be on the Linode 1024 plan; it will be set up with a 22GB main volume, and a 256MB swap volume, with the latest 64-bit kernel.

You can change any of the above assumptions by editing the code on lines 20-26.

The script will create a new VPS, and will copy the public IP of the new node to the clipboard. From there, you can open Coda, create or edit a site configuration there, and paste in the new IP. In my experience, by the time you open Coda and paste in the new IPs, the VPS will be booted and ready to connect.

To make things a bit more automated, I run the script from a workflow in the Workflow app; here is a screenshot of the workflow I use:

image

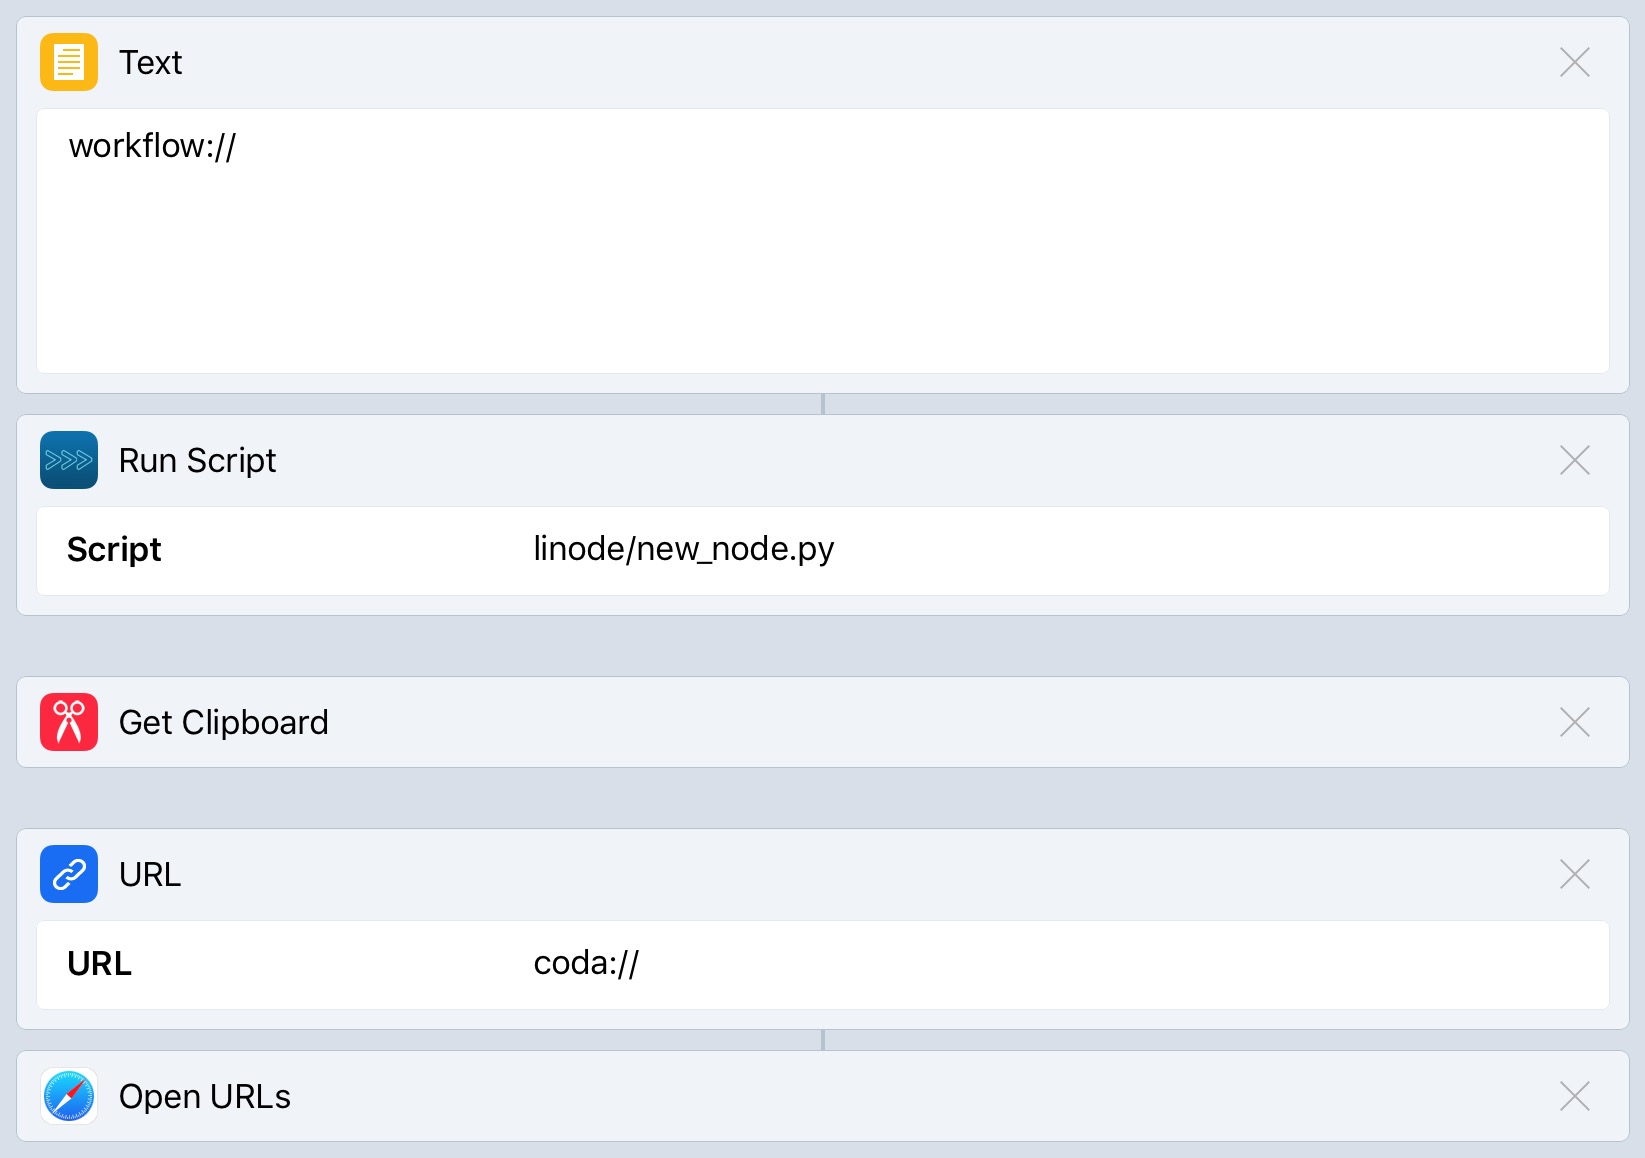
It’s quite simple – it just runs the Pythonista script, sending “workflow://” as the return URL, and then opens Coda, with the new IP address on the clipboard ready to paste into your site configuration. I add a shortcut to the workflow to my home screen, and I can spin up a new node with literally one tap. But if you want to, you could do the equivalent without using Workflow at all in this case.

We can also delete the node when we’re done, using another script; be careful with this one, and make sure you completely understand what it’s doing before you run it – if it finds a node called dev01 in the Dev group, it will delete it without confirmation:

Using these scripts and the apps I’ve mentioned, I’ve found development on the iPad Pro (with a keyboard) can be quite similar to the equivalent on a desktop.

Using Working Copy with 1Writer on iPad Pro

Over the last month or so, I’ve been doing development and other work with a new iPad Pro, and the smart keyboard. I sometimes get incredulous looks from people when I tell them about this, so I thought I’d write about some of the things I’ve been doing. First up, editing markdown files in a Github repository.

Working Copy (app store) is one of those apps that seems to fly below the radar – but it’s by far the best git client I’ve found for iOS. It’s free to try, with a in-app purchase to unlock certain features like the ability to push changes to a remote repository. But my favorite part is the way it implements a document provider, allowing you to edit files in your repo with other applications. So here, I’ll show you how to edit markdown files in your repo using another great app, 1Writer (app store).

First, you need to clone your repository into Working Copy. Once you have it down, it will look something like this:

img_0021

Here, this repository is a set of API documentation that I want to edit. Now, we could edit this right here within Working Copy, but instead we will use 1Writer. Open 1Writer, and click the “+” button in the lower right corner:

The first time you do this, you’ll notice Working Copy isn’t in the list. Click “More”, and you’ll be able to enable it:

After you get it enabled, you’ll see it in the list:

Now tap Working Copy, and you’ll see a list of documents you can open from the repository:

img_0025

Pick the document you want (we’ll edit the README.md as an example), and make your edits.

When you’re done editing, go back to Working Copy:

img_0026

You’ll see on the left that README.md is modified, and if you tap on it, you can see the changes that were made. When you’re ready, you can click “Commit” to commit the changes you’ve made, and then push to remote repository if you need to.

Zero to PostgreSQL streaming replication in 10 mins

I’ve found a number of articles on the web for setting up streaming replication in PostgreSQL, but none of them seemed to actually put everything together that I needed, and none of them seemed to use the new pg_basebackup in PostgreSQL 9.1 and later. So with that in mind, here are a set of steps you can use to set up streaming replication, over the internet if you wish, using an encrypted SSL connection. We’re not going to set up log archiving – we’re going to rely solely on the streaming replication for now.

I’m assuming you have a master server set up on Ubuntu 10.04 or 12.04, running PostgreSQL 9.2.x, and you have a new slave server set up on the same OS and pg version. The IP of the master is 1.2.3.4, and the IP of the slave is 5.6.7.8.

First, create the replication user on the master:

Note that we are using REPLICATION permissions, rather than creating a superuser.

Next, configure the master for streaming replication. Edit postgresql.conf (on Ubuntu, this is at /etc/postgresql/9.2/main/postgresql.conf):

We’re configuring 8 WAL segments here; each is 16MB. If you expect your database to have more than 128MB of changes in the time it will take to make a copy of it across the network to your slave, or in the time you expect your slave to be down for maintenance or something, then consider increasing those values.

Then edit the access control on the master to allow the connection from the slave; in pg_hba.conf (/etc/postgresql/9.2/main/pg_hba.conf on Ubuntu):

In this case, 5.6.7.8 is the IP address of the slave that will be connecting for replication, and hostssl means this host can only connect via SSL.

You’ll need to restart the master after making the above changes.

Now on to the slave. In the slave’s postgresql.conf, add the following:

Then restart the slave. No changes are required in the slave’s pg_hba.conf specifically to support replication. You’ll still need to make whatever entries you need in order to connect to it from your application and run queries, if you wish.

That’s all the initial setup we need to do. After you’ve done the above configuration, running the following script on the slave will copy the database over and begin replication (1.2.3.4 is the IP of the master):

That script will stop the slave, delete the old slave cluster directory, run pg_basebackup connecting to the master to copy over the databases (you’ll see the progress as it goes), create a new recovery.conf file, and start the slave. If you look at the logs after this script completes, you should hopefully see messages about it having reached a consistent recovery state.

Be careful – that script is going to delete the old database cluster on your slave, so make sure to read through it and understand what it’s doing.

At this point, you can try writing data to the master database, and you should see it mirrored over to the slave. To check the replication status, you can run the following on the master:

If you found this guide handy, you might also find the PostgreSQL 9 High Availability Cookbook useful as well!

On the MacBook Pro with Retina display

There has been much written about the new MacBook Pro with Retina display. I’ve had one for about a week; I’m not going to write a review, as I’m not sure how anyone could compete with this review…but rather I’ll just mention a few things I’ve noticed in using it for my work.

First, the retina display is quite striking when you use it with applications that have been updated with retina graphics. Most websites that have not updated their graphics don’t look good at all, as I said earlier:

The “blurry” effect is actually more noticeable on the MacBook Pro than it is on the iPad. So for the many, many folks I’ve heard saying “my site looks ok on the iPad, so I’m not going to worry about it” – my recommendation is take a look at it on the MacBook Pro, and make sure you’re comfortable with how it looks. Hint: it probably looks worse than you think.

There are two things that I’ve found a little painful at the moment when using the new MacBook Pro, as Joshua Johnson also noticed.

First, trying to edit 1x artwork on the retina screen is definitely a challenge. At the moment, you just can’t really tell how it’s going to look on a non-retina screen. Maybe a future update to Photoshop CS6 or Pixelmator or some other app will fix this; we’ll have to see.

And second, taking a screenshot on the retina MBP results in an image that’s twice the size you expect; for example, if you’re running at the “ideal” 1440×900 effective resolution, screen shots will be at 2880×1800. That’s great if you need a 2x screenshot to display on a retina display…but if you need a screenshot to display on a 1x display, you don’t have great options. You can downsize it in Photoshop or other editor, but you lose quality.

My solution to both of these problems has been to connect a regular non-retina screen for those tasks. This also has the advantage of letting me see quickly how things are looking on both retina and non-retina screens side by side, at the cost of being tethered to my desk…

All in all, the machine is beautiful, the screen is stunning when viewing high resolution content, and the machine is quite fast as compared to my other machines. I think the issues I mentioned above will probably (hopefully!) work themselves out as the software catches up with the display.

Glassboard 2.0 and Glassbot

The folks at Sepia Labs have released Glassboard 2.0 this morning. Lots of new features in the iPhone and Android apps…but my favorite part is the new web client.

When I first started using the web app a couple of weeks ago, it struck me as a game-changer for Glassboard. Where I would use the mobile apps for casual messages, with the web app I could keep it up on my desktop screen, and send messages and updates much more quickly. I found I was using it for real work.

Which got me to thinking, I’d like a way to automatically post content into a board. For example, maybe I’d like commit notices from Github to be automatically added to a board. Or maybe new support tickets. Or maybe just a way to have some fun with my friends – who doesn’t like seeing a coworker with a huge mustache?

So I created glassbot – a bot for Glassboard…and glassbot_recv, which allows you to post external content into a board.

If you want to try it, you can either:

  • Join the Glassbot Playground board with invitation code cfoli – once you’re in, post a message like “@glassbot help” (without the quotes) to see what he can do.
  • Invite the Glassbot to your own board! Just invite “glassyglassbot@gmail.com” to your board; he’ll accept within a few seconds, and then enter “@glassbot help” (again without the quotes) to see what he can do.

After you invite the glassbot, you can add a post-receive webhook from Github if you want to see notifications – use the URL

http://glassbot-recv.herokuapp.com/github/{BoardId}

as the endpoint URL, replacing {BoardId} with the ID of your board (you can see this in the Glassboard web app).

If you have ideas of things Glassbot could do, or you want to run your own, the code is available at glassbot (in Ruby) and glassbot-recv (Node.js) – add some new actions and let’s have some fun!

Because every board needs a bot.

UPDATE 06/12/2012 – the source code links have been removed at the request of the Glassboard team, while they are making changes to their API. The glassbot is still running, though, and you can still invite it to your boards. I’ll put the code back up when I get the ok.

Tradervue launches today!

Well, it’s been a while in the making, but today I’m very excited to announce the launch of Tradervue, a web application for active traders!

When I left my full-time position at NewsGator about a year and a half ago, I started actively trading equities intraday. Yep, one of those day traders. I was thinking “I’m an engineer, how hard can this be?” Ha! Turns out it was harder than I thought.

I spent some time searching for a trading methodology that worked for me, and one that specifically worked for my personality. I like instant gratification – I often use overnight shipping when I order things, I hate that my TV takes 10 seconds or so to warm up, and I like trading during the day where I’m not subject to the whims of the market overnight when I can’t do much about it.

I eventually settled into a rhythm, with the help of many smart traders I met online, where I was trading actively moving stocks that had some catalyst for moving that day (earnings announcement, fresh news, etc.), and I would watch the order flow and do my thing. I worked pretty hard at it – I was at the screens an hour before the market opened, would trade most of the day, and then a few hours of prep work at night for the next day.

I also kept a trading journal in Pages (a word processor), where I would write down why I was making certain trades, how I was feeling about it at the time (confident, anxious, etc.), and I’d paste in order execution data and charts from my trading platform at the end of the day. I’d review this journal at the end of the week, and try to learn from my successful and not-so-successful trades. All in all, this was one of the best tools I had for understanding my trading.

But I hated keeping it.

I didn’t mind writing in it – why I was taking a trade, what was making me nervous about it, etc. That part was easy, and pseudo-creative work. What I hated was having to paste in my execution data, and pasting charts into it from my trading platform. It ended up being about an hour of busy-work at the end of every trading day. Once I even caught myself not taking a quick trade because I didn’t want to add even more work to my after-close routine. Obviously not good; my very best tool for improving my trading was becoming so onerous it was discouraging me from trading.

On the advice of many experienced traders, I also made a list of trading goals for the year. For 2011, two of my non-P&L-related trading goals were a) continue keeping my trading journal, because I was learning a lot from doing it, and b) come up with a way to objectively analyze my data to understand strengths and weaknesses that might not be obvious. For the second item, my hope was to find a product that would just work for me; I looked around for a while, but never found anything that “clicked.”

So with these two things in the back of my mind, I set to work to build something, just for myself, to address them. Find a way to write in my journal, but have the busy work be automated. Find a way to load all of my trading data, and show me views of it I haven’t seen before. Show me what’s working. And show me what’s not.

As I was building this, somehow I got distracted and decided to refocus a bit, and build a web application that could do this for everyone. And so was born Tradervue.

As Tradervue was taking shape, in the back of my mind I was thinking about the trading community I had learned a lot from, and the traders that actively share their ideas online on Twitter, StockTwits, and their blogs. What I have rarely seen is traders sharing actual trades. I don’t mean the sensitive data like how many shares were traded, or how much money was made – that’s not important. Rather, things like where did you enter this trade? How did you get in when it popped through the price level you were watching, but then dropped 0.50 before moving higher? When did you start to sell? Questions like that. Execution is everything – and so perhaps show people how you executed.

As I thought more about this, I noted that Tradervue had all of the data necessary to share trades. The challenge was more a matter of figuring out specifically what information should be excluded and kept private, and then make it easy to share the more educational parts. Shouldn’t it just be a click or two to share a trade with the community, complete with charts and commentary? I thought so.

So I built the sharing into Tradervue. And combined with the trading journal capabilities (with generated charts) and the analysis it can do, allowing you to drill down as far as you want, I think it’s a pretty cool product.

There were beta users whose average session length was measured in hours, with no more than a few minutes idle during that period. It was quite amazing, and exciting; I’m even more excited to see where it goes from here.

So, happy birthday to Tradervue – today is its day!

Customized Capistrano tasks per-host

This was something that took a while to piece together, and most of the links I found on the net pointed to vastly more difficult solutions.

The problem: I wanted to create iptables rules that would lock down the back-end private IP’s of my servers to allow access only from each other. Every time I add or remove a server, these rules need to be rewritten, so my Capistrano deployment seemed the logical place to do this (as opposed to my server installation scripts).

But…each server needed its own rules, which would be different from each other because the interfaces would be different. And in Capistrano, this isn’t really the default mode of operation. It’s easy to customize tasks by role, but doing it by host (while allowing for easy addition or removal of hosts) is harder.

You do have access to $CAPISTRANO:HOST$ within your tasks; however, this is only evaluated within the context of certain functions like “run”. Which may or may not help…in this case, it did not.

Here are the relevant snippets from what I did. First, I added a custom attribute ‘internal’ to each host, which is its internal IP address:

Then, inside my :update_rules task, I needed an array of all the internal IPs, so I find the servers for the task (using find_servers_for_task) and iterate over them to pull out the :internal attribute:

And finally, the part that does something different on each server…here, for each server, I add rules for all of the internal IPs; note the :hosts option on the run command, which specifies the task will run on only that host (sorry for the line wrapping).

I’m looping through all the servers, running a specific task on each of them. This isn’t perfect; it will run on only one host at a time, rather than running in parallel…but it gets the job done!

Learning Ruby and Rails

A few weeks ago, I decided it was high time to get back to writing code. NewsGator’s code is based on Microsoft .net, and much of my career has been building products for Windows. Given that, I figured it was time to learn how the other half lives.

I started this adventure learning PHP (which reminded me a lot of pre-.net ASP, with some extra language constructs like classes sort of bolted on), and dabbling enough with MySQL that I could do what I wanted.

Then I decided it was time to learn Ruby and Rails. It actually took a fair amount of effort to figure out how to get started there, and I didn’t find any blog posts that really laid it out all in one place…so here is what I did.

First, I wanted to learn the language without the additional complexity of Rails on top of it. I downloaded the ruby_koans project, which essentially has a bunch of test cases, and code that you need to fix in order to continue. It was a unique way to learn, I thought, but I think I got a fair amount out of it.

After I was done with that, I thought I generally had the idea, but wanted to dive a little deeper into the language. So I read the Humble Little Ruby Book. I found the writing style a little distracting at times, but the book went beyond what I had learned with the ruby_koans, and after I was done I felt like I was ready to go. If you read this book, read the PDF version rather than the HTML version – the PDF one has much better code formatting (indents, etc.)

Ok, now that I was an expert in Ruby (ha), it was time to dive into Rails. Somehow I stumbled across the Ruby on Rails Tutorial by Michael Hartl. This was absolutely fantastic – I worked through it over a few days, and it provided a great foundation in Rails. I really can’t recommend this enough; he even covers rvm, git, rspec, heroku, and lots of other real-world topics. You can buy the book, buy a screencast version, or go through the free online version.

The beginning of that tutorial gave a little taste of using Git and Github; I realized I was going to need to learn a little more about git. To do this, I’ve been reading Pro Git by Scott Chacon, which seems like the go-to reference for git. You can read it online for free, or buy the book.

And then finally, as I’ve been working on a new project, I’ve been reading through the Rails Guides, a little at a time. They sort of pick up where the Ruby on Rails Tutorial leaves off, filling in details on specifics.

Hopefully this will be helpful for some folks…and I’m happy to finally have all these links in one place. If there are other great resources out there, please leave a comment and let me know!