Author Archives: gregr

Editing Canon 30p “PF30” footage in FCPX

Based on what you usually see on this site, you might think came out of nowhere, but it took many hours to figure this out, and there is precious little information on the net with actual answers.

Canon’s current consumer and prosumer camcorders (HF M40, HF M41, HF M400, HF S30, HF G10, XA10, and others) encode in AVCHD, and have the ability to record in 30p. However, in the Canon specs, this is described as “30p progressive (records at 60i)”.

The common first-100-google-hits about this suggest doing one of two things:

1. Edit in a 60i (29.97i) interlaced timeline.

2. De-interlace the footage, and edit in a 29.97p timeline.

There are problems with both of these.

It’s not obvious, but it seems that the “PF30” footage (as the Canon cameras call it in their configurations) is recorded as “Progressive Segmented Frame“. In layman’s terms (and believe me, I’m a layman when it comes to this), this means an entire frame is captured in the camera, and then it’s recorded into two separate fields in the 60i recording. The two fields, together, make up the frame.

Sounds a lot like interlaced footage, right? No. With true interlaced footage, half of the frame lines are recorded in each field…but each field is 1/60 second apart. So there are no two fields which, when combined, will yield a complete frame at a single point in time.

So this demonstrates the problem with both #1 and #2 above. If you edit in an interlaced timeline, you’re using footage that isn’t really interlaced. And if you de-interlace it, you’re close but you may not end up with what the camera recorded…and, it’s an unnecessary step, since the footage isn’t interlaced.

Ideally, the editor would detect this PF30 footage, and import it as 30p. However, most editors today do not. Here’s an article about this, re the Canon XA10. In Final Cut Pro X, importing this footage just using Import From Camera will show it as 29.97i.

So what to do? I’ve found two ways to get this footage interpreted correctly as 30p by Final Cut Pro X:

1. Use ClipWrap, a third-party tool (see article). Or…

2. Simply import into FCPX twice; do something like the following:

  • Use Import From Camera to import your footage into Event1.
  • Then, use Import Files, and import the files in Final Cut Events / Event1 / Original Media – and copy them into a new Event2.

When you import the second time, the files are just copied over – you can compare the timestamps if you want – so you’re not losing any quality. And after you do this, you’ll see the footage after the second import is shown as 29.97p…and will not need to render if dropped into a 29.97p timeline. Whew!

When I was trying to find the difference between the first and second import, I noticed the second had the Field Dominance Override set to “Progressive”. Aha, I thought…one could simply change this setting on the original first-import footage, and it will be interpreted as 29.97p. And at first glance, it appears to work. However, if you take this footage and put it in a 29.97p timeline, it will have to render, and this should be unnecessary. Just using a second import step eliminates this problem.

So anyway, hopefully this will save someone else a few hours of research!

Just another day at the office

Well, ok, maybe another day out of the office. :-)

The technical details…onboard footage was filmed in Bear Creek Canyon, just outside of Morrison, CO. It was shot with a GoPro HD; mounted via suction cup to the tank and to the side of the fairing. Other footage is from a Canon HF M40. The bike is my much-loved 2010 ZX-6R, which was badly in need of a bath!

Tradervue launches today!

Well, it’s been a while in the making, but today I’m very excited to announce the launch of Tradervue, a web application for active traders!

When I left my full-time position at NewsGator about a year and a half ago, I started actively trading equities intraday. Yep, one of those day traders. I was thinking “I’m an engineer, how hard can this be?” Ha! Turns out it was harder than I thought.

I spent some time searching for a trading methodology that worked for me, and one that specifically worked for my personality. I like instant gratification – I often use overnight shipping when I order things, I hate that my TV takes 10 seconds or so to warm up, and I like trading during the day where I’m not subject to the whims of the market overnight when I can’t do much about it.

I eventually settled into a rhythm, with the help of many smart traders I met online, where I was trading actively moving stocks that had some catalyst for moving that day (earnings announcement, fresh news, etc.), and I would watch the order flow and do my thing. I worked pretty hard at it – I was at the screens an hour before the market opened, would trade most of the day, and then a few hours of prep work at night for the next day.

I also kept a trading journal in Pages (a word processor), where I would write down why I was making certain trades, how I was feeling about it at the time (confident, anxious, etc.), and I’d paste in order execution data and charts from my trading platform at the end of the day. I’d review this journal at the end of the week, and try to learn from my successful and not-so-successful trades. All in all, this was one of the best tools I had for understanding my trading.

But I hated keeping it.

I didn’t mind writing in it – why I was taking a trade, what was making me nervous about it, etc. That part was easy, and pseudo-creative work. What I hated was having to paste in my execution data, and pasting charts into it from my trading platform. It ended up being about an hour of busy-work at the end of every trading day. Once I even caught myself not taking a quick trade because I didn’t want to add even more work to my after-close routine. Obviously not good; my very best tool for improving my trading was becoming so onerous it was discouraging me from trading.

On the advice of many experienced traders, I also made a list of trading goals for the year. For 2011, two of my non-P&L-related trading goals were a) continue keeping my trading journal, because I was learning a lot from doing it, and b) come up with a way to objectively analyze my data to understand strengths and weaknesses that might not be obvious. For the second item, my hope was to find a product that would just work for me; I looked around for a while, but never found anything that “clicked.”

So with these two things in the back of my mind, I set to work to build something, just for myself, to address them. Find a way to write in my journal, but have the busy work be automated. Find a way to load all of my trading data, and show me views of it I haven’t seen before. Show me what’s working. And show me what’s not.

As I was building this, somehow I got distracted and decided to refocus a bit, and build a web application that could do this for everyone. And so was born Tradervue.

As Tradervue was taking shape, in the back of my mind I was thinking about the trading community I had learned a lot from, and the traders that actively share their ideas online on Twitter, StockTwits, and their blogs. What I have rarely seen is traders sharing actual trades. I don’t mean the sensitive data like how many shares were traded, or how much money was made – that’s not important. Rather, things like where did you enter this trade? How did you get in when it popped through the price level you were watching, but then dropped 0.50 before moving higher? When did you start to sell? Questions like that. Execution is everything – and so perhaps show people how you executed.

As I thought more about this, I noted that Tradervue had all of the data necessary to share trades. The challenge was more a matter of figuring out specifically what information should be excluded and kept private, and then make it easy to share the more educational parts. Shouldn’t it just be a click or two to share a trade with the community, complete with charts and commentary? I thought so.

So I built the sharing into Tradervue. And combined with the trading journal capabilities (with generated charts) and the analysis it can do, allowing you to drill down as far as you want, I think it’s a pretty cool product.

There were beta users whose average session length was measured in hours, with no more than a few minutes idle during that period. It was quite amazing, and exciting; I’m even more excited to see where it goes from here.

So, happy birthday to Tradervue – today is its day!

Customized Capistrano tasks per-host

This was something that took a while to piece together, and most of the links I found on the net pointed to vastly more difficult solutions.

The problem: I wanted to create iptables rules that would lock down the back-end private IP’s of my servers to allow access only from each other. Every time I add or remove a server, these rules need to be rewritten, so my Capistrano deployment seemed the logical place to do this (as opposed to my server installation scripts).

But…each server needed its own rules, which would be different from each other because the interfaces would be different. And in Capistrano, this isn’t really the default mode of operation. It’s easy to customize tasks by role, but doing it by host (while allowing for easy addition or removal of hosts) is harder.

You do have access to $CAPISTRANO:HOST$ within your tasks; however, this is only evaluated within the context of certain functions like “run”. Which may or may not help…in this case, it did not.

Here are the relevant snippets from what I did. First, I added a custom attribute ‘internal’ to each host, which is its internal IP address:

Then, inside my :update_rules task, I needed an array of all the internal IPs, so I find the servers for the task (using find_servers_for_task) and iterate over them to pull out the :internal attribute:

And finally, the part that does something different on each server…here, for each server, I add rules for all of the internal IPs; note the :hosts option on the run command, which specifies the task will run on only that host (sorry for the line wrapping).

I’m looping through all the servers, running a specific task on each of them. This isn’t perfect; it will run on only one host at a time, rather than running in parallel…but it gets the job done!

Sparrow

If you haven’t yet seen it, Sparrow (Mac app store) is an email client for the Mac that really focuses in on great Gmail support, and has a very different UI than Apple Mail. Ever since Sparrow was released, there has been a lot of chatter about it; nearly all of what I have read has been very positive. I’ve been using the app every day for about six weeks, and I wanted to post my thoughts about it.

If you’re a heavy email user, then you can’t take switching email clients lightly. You know all of the keyboard shortcuts of your client, and if something changes even subtly you will notice. Consistency and reliability are the most important traits. No one likes sitting around in their email app, so anything that helps you get in and get out quickly is what you’re looking for.

I’m not going to walk through how Sparrow works – there are videos on the web site you can watch, or you can read many reviews around the net going into detail on the app.

These are the things I found good about Sparrow, as a user who had been using Mail:

  • It’s very pretty. It looks more like Twitter for Mac than Mail, at least when you’re just looking at the message list.
  • It works really well with Gmail. There is a button for archiving, and shortcuts to label and archive. It displays conversations quite effectively.
  • Just added in 1.2, the Universal inbox feature was a great usability enhancement.
  • It has a great quick reply feature, where it opens a control for you to type a response without having to pop up a whole message window.
  • It’s “different”, and somehow more “fun”. I can’t quite put my finger on it, but there’s something satisfying about using it.

But not everything is roses. Here are the things that gave me fits:

  • It’s not so smart about image attachments. I took a screenshot of a window to email to a friend, and pasted it into a new message in Sparrow. It sent it as a 7MB TIFF file…but when I paste the same thing into Mail, it pastes in “actual size” as a 45KB PNG file. Needless to say, defaulting to a multi-megabyte TIFF is unexpected.
  • I have a colleague using Outlook on Windows, who sends me a regular email that has two attachments (a docx and a xlsx file). These do not make it into Sparrow intact, but rather show up as a “winmail.dat” attachment. Yikes – I thought this problem was behind us! I actually have to open these messages in the google web client to read them.
  • No spotlight integration. For me, this is a big one, because I use spotlight all the time…
  • I’m not sure I can put this down as a “con”, but some of the animations in Sparrow which are very sexy when you first get started, become less endearing as time goes on. Expanding out the message pane, for example, could be a little faster. I also notice choppy animations when having a new message window animate across multiple screens on my Mac Pro. This isn’t the end of the world, but it’s the little things that you notice day in and day out.

The first three issues on the list above are enough to have made me finally switch my accounts back to Mail. Proper encoding and decoding of attachments is pretty much table stakes in this game, and Spotlight is something I’ve grown to expect of an app like this as well. It’s a little bizarre to me that they’ve spent time adding things like Facebook integration (still not sure why I need that), as opposed to really solidifying the app, but clearly they have a vision in mind.

So I’m back to Mail. To help make Mail more usable with Gmail, I’ve added the Archive button plug-in, which adds a button and a keyboard shortcut to archive messages. So now, “delete” sends a message to the trash, and “archive” archives it to “all mail”, which is exactly how I would expect it to work. This alone has made Mail so much more usable with Gmail and Google Apps.

As for Sparrow, I’m not giving up on it, but I’ll wait for some of the problems and usability issues to get worked out. And I’m really looking forward to trying Mail in Lion, which looks like a major upgrade over prior versions.

Generic terms of service

I’ve written in the past about Facebook and Picasa and their (IMHO) ridiculous terms (at least at the time, I haven’t reviewed them lately). Now twitpic, a site that we all use used to upload pictures to show on twitter has decided that they are more than welcome to sell our pictures. They even tried to say “everyone does it” with the new, improved, “you own the copyright but we’ll still do whatever we want” terms. Luckily, we are welcome to switch services, and I suggest you think about it if you care about this sort of thing.

More generally, to solve this whole TOS problem, I hereby propose two sets of terms of service agreements, and a company can just pick one and put it on their web site. They’re even short enough to put on the front page, instead of behind the tiny link hidden below everything else. Short enough that *gasp* people might even read them.

Option 1: (e.g. twitpic, along with twitter and many others)

We provide a service. You upload your stuff. Don’t upload porn or illegal stuff. Once you upload it, we own it as much as you do, and we’ll do whatever we please with it. You promise to defend us from anyone who doesn’t like that.

Option 2: (e.g. yfrog, smugmug, and others)

We provide a service. You upload your stuff. Don’t upload porn or illegal stuff. We’ll put your stuff on our web site like you asked.

Add something to both of those like “we won’t tell anyone your email or contact info” and I think the terms would be pretty much complete.

Learning Ruby and Rails

A few weeks ago, I decided it was high time to get back to writing code. NewsGator’s code is based on Microsoft .net, and much of my career has been building products for Windows. Given that, I figured it was time to learn how the other half lives.

I started this adventure learning PHP (which reminded me a lot of pre-.net ASP, with some extra language constructs like classes sort of bolted on), and dabbling enough with MySQL that I could do what I wanted.

Then I decided it was time to learn Ruby and Rails. It actually took a fair amount of effort to figure out how to get started there, and I didn’t find any blog posts that really laid it out all in one place…so here is what I did.

First, I wanted to learn the language without the additional complexity of Rails on top of it. I downloaded the ruby_koans project, which essentially has a bunch of test cases, and code that you need to fix in order to continue. It was a unique way to learn, I thought, but I think I got a fair amount out of it.

After I was done with that, I thought I generally had the idea, but wanted to dive a little deeper into the language. So I read the Humble Little Ruby Book. I found the writing style a little distracting at times, but the book went beyond what I had learned with the ruby_koans, and after I was done I felt like I was ready to go. If you read this book, read the PDF version rather than the HTML version – the PDF one has much better code formatting (indents, etc.)

Ok, now that I was an expert in Ruby (ha), it was time to dive into Rails. Somehow I stumbled across the Ruby on Rails Tutorial by Michael Hartl. This was absolutely fantastic – I worked through it over a few days, and it provided a great foundation in Rails. I really can’t recommend this enough; he even covers rvm, git, rspec, heroku, and lots of other real-world topics. You can buy the book, buy a screencast version, or go through the free online version.

The beginning of that tutorial gave a little taste of using Git and Github; I realized I was going to need to learn a little more about git. To do this, I’ve been reading Pro Git by Scott Chacon, which seems like the go-to reference for git. You can read it online for free, or buy the book.

And then finally, as I’ve been working on a new project, I’ve been reading through the Rails Guides, a little at a time. They sort of pick up where the Ruby on Rails Tutorial leaves off, filling in details on specifics.

Hopefully this will be helpful for some folks…and I’m happy to finally have all these links in one place. If there are other great resources out there, please leave a comment and let me know!

Traffic threshold pepper extension for Mint stats

I’ve started using Mint for web stats on this site. I stumbled across a review from Shawn Blanc that he wrote about an older version a while back, and decided to try it. It’s a web stats package that you install on your server, and it’s really focused on what’s happening right now (as opposed to deep dives on old historical data). I’ve had it running for about a week, and I love it so far! It’s also extensible with add-ins called “peppers” which can be found in a directory on the site.

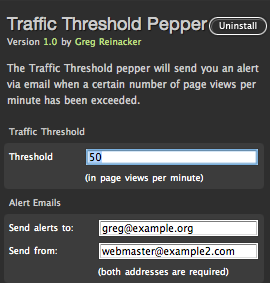
Not one to leave well enough alone, I also wrote a pepper. Sometimes this site gets bursts of traffic, which I don’t always find out about until later when I’m looking at the stats. So I wrote a “Traffic Threshold” pepper which will send an alert via email when a certain number of page views per minute has been hit.

PreferencesIt’s designed to be super fast. No extra script is used on the client side. The preferences are stored in the Mint database using the Pepper API, so Mint will load them (and it’s designed to load pepper preferences efficiently). The actual page view counting, though, isn’t done with the database or a file, but rather uses a unix system V shared memory segment. Web requests are served from multiple processes, and thus the page view counter needs to be saved somewhere where they can all access it; shared memory (with synchronization to protect against simultaneous updates) is one of the fastest ways to do this.

The shared memory is allocated on installation (when the pepper is testing to see if the required APIs are available), and will be cleaned up when the pepper is uninstalled. It won’t work on every system – for example, if you’re on a shared hosting plan, the required APIs may be disabled. But you can give it a shot, and you’ll see a message during configuration if the pepper can’t be installed.

It also assumes you have a default mailer set up on your system to send mail. It measures using clock minutes, rather than a 60-second sliding window. There are technical reasons for this, but most folks will never notice. And it will only work for sites hosted on a single server. If you’re a bigger site that’s hosted across a large web farm, you probably don’t need this pepper anyway!

I’ll submit this shortly to the Mint Peppermill, but in the meantime you can download it here.

Update: now available from the Mint site.

Update 2: source now available on Github; if you have ideas to make it better, feel free to contribute!

Don on the Amazon outage

An excellent article from the super-smart Don MacAskill, CEO of Smugmug, on how they survived the Amazon Web Services outage and a few tidbits about how their system is designed. One little tidbit:

Once your system seems stable enough, start surprising your Ops and Engineering teams by killing stuff in the middle of the day without warning them. They’ll love you.

You know you’re confident in your system when you throw a dart at a board full of “kill” buttons. :-)

Don was one of the early folks to make a big commitment with AWS – he’s been through a lot with them, and has learned a ton of useful things. Definitely worth a read!